No edit summary |
No edit summary |
||
| (42 intermediate revisions by 2 users not shown) | |||
| Line 1: | Line 1: | ||
| + | == ''Navigation'' == |
||
| − | <center><tabber>|-|General Information={|class="wikitable sortable" |
||
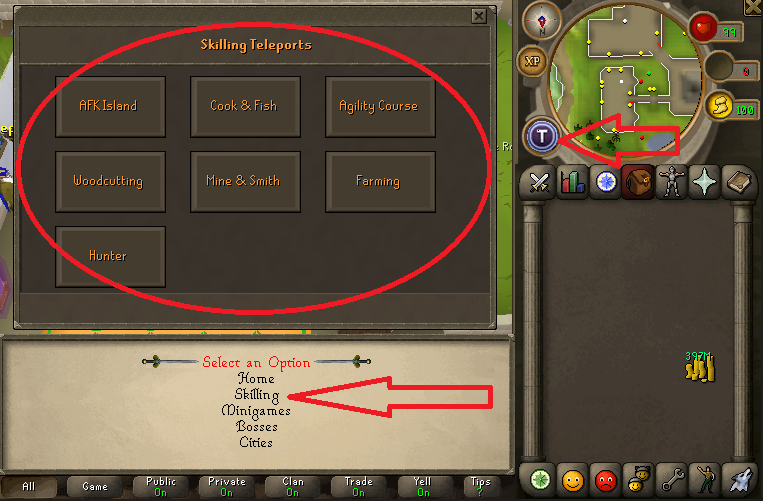
| − | === '''How to Start''' === |
||
| − | Skilling on Apex is extremely worth while, it is used to obtain resources that aid P.V.M. ventures. To access various skilling areas, click on the teleport button next to the mini-map. |
||
| + | <div class="center" style="width: auto; margin-left: auto; margin-right: auto;"> |
||
| − | |||
| + | ---- |
||
| − | [[File:SKilling5.png|centre|thumb|450x450px]] |
||
| + | <small style="font-size:200%;"><span style=color:white>Skilling Guides</span></small> |
||
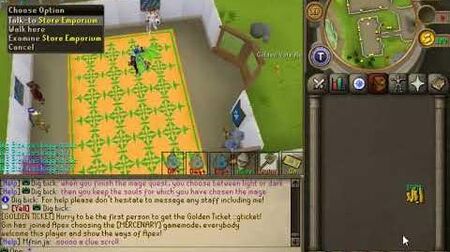
| − | === ''Tools'' === |
||
| + | ---- |
||
| − | General skilling supplies can be purchased from the skilling shop named '''Store Emporium'''. |
||
| + | {| border="3" cellpadding="2" |
||
| − | This store is located at home in the north-eastern building. |
||
| − | [[File:Skilling|centre|thumb|450x450px]] |
||
| − | |||
| − | {| class="article-table" |
||
| − | ! |
||
| − | ! |
||
| − | ! |
||
|- |
|- |
||
| + | |[[Agility]] |
||
| − | |[[File:6.PNG|centre|thumb|170x170px|<span class="minigame-button">[https://apexps.fandom.com/wiki/EXP_Boosts/ EXP Boost]</span>]] |
||
| + | |[[Crafting]] |
||
| + | |[[Fletching]] |
||
| + | |[[Mining/Smithing]] |
||
| + | |[[Summoning]] |
||
| + | |[[Construction]] |
||
| + | |[[Firemaking]] |
||
|- |
|- |
||
| + | |[[Herblore/Farming]] |
||
| + | |[[Runecrafting]] |
||
| + | |[[Thieving]] |
||
| + | |[[Cooking]] |
||
| + | |[[Fishing]] |
||
| + | |[[Hunter]] |
||
| + | |[[Slayer]] |
||
|} |
|} |
||
| + | ---- |
||
| − | |||
| + | <small style="font-size:200%;"><span style=color:white>Miscellaneous Guides</span></small> |
||
| − | |-|EXP Boosting={|class="wikitable sortable" |
||
| + | ---- |
||
| − | |||
| + | {| border="5" cellpadding="2" |
||
| − | === '''Apex Guide EXP Boost''' === |
||
| − | You can drastically increase your overall EXP gained by purchasing the 'Superiority' EXP option for 2B. This NPC is located inside the bank at home. |
||
| − | === '''Double EXP Ring''' === |
||
| − | The Double EXP Ring offers double EXP in all combat and non combat skills. This ring can be obtained by talking to the Prestige Master which is an achievement or by purchasing it from the [[Loyalty Store]] for 15,000 Loyalty Points. |
||
| − | === '''Membership 2x EXP Bonus''' === |
||
| − | If you claim a [[membership ticket]] or a [[membership bond]] you will be provided double exp aslong as the membership lasts. |
||
| − | === '''The Dictator''' === |
||
| − | The Dictator is a group boss that when killed it will provide the server with a global EXP boost of 5X for 1 hour, this boss can be killed once per 6 hours. The EXP Boost does drop down 1X point per 10 minutes. To access this boss you can type ::ed to enter the castle. |
||
| − | [[File:Dictator.png|centre|thumb|450x450px]] |
||
| − | |||
| − | |-|Prestiging={|class="wikitable sortable" |
||
| − | === '''The Benefits''' === |
||
| − | Prestiging is often looked at as a time consuming grind but it does come with some unique and useful perks. In order to prestige you need all combat and non combat stats to 99, this however excludes Dungeoneering. To Prestige you will need to talk to the Prestige Guide located inside the bank at home. Players are rewarded with a permanent +0.02X Drop Boost and 200-600 Prestige Points per prestige (random). Players also have the option to add a prestige title to their in-game name by talking to the Prestige Guide. By prestiging you unlock various bosses around Apex when you obtain higher and higher prestige levels. |
||
| − | |||
| − | === '''Quick Prestiging''' === |
||
| − | Players that lack the patience for skilling can purchase 99 EXP Lamps from players for around 3-5B each or from donating. |
||
| − | |||
| − | [[File:Ressssssss.png|centre|thumb|450x450px]] |
||
| − | |||
| − | |-|Runecrafting={|class="wikitable sortable" |
||
| − | === '''General''' === |
||
| − | Runecrafting is a skill in which players have the ability to create various runes which are used in the Magic skill. Players can purchase essence and talismans from the Skilling Points Shops which are found at every skilling location teleport. By right clicking on a talisman it will teleport you to the corresponding rune altar. |
||
| − | |||
| − | === '''Runecrafting''' === |
||
| − | {| class="wikitable" |
||
| − | ! style="text-align: center; font-weight:bold; background-color:#fe0000; color:#ffffff;" | LVL Required |
||
| − | ! style="text-align: center; font-weight:bold; background-color:#fe0000; color:#ffffff;" | Runes |
||
|- |
|- |
||
| + | |[https://apexps.fandom.com/wiki/EXP_Boosts ''Experience Bonus''] |
||
| − | | style="text-align: center; background-color:#fe0000; color:#ffffff;" | 1 |
||
| + | |[https://apexps.fandom.com/wiki/Prestige_Reward_Shop ''Prestiging''] |
||
| − | | style="text-align: center; background-color:#fe0000; color:#ffffff;" | Air Runes |
||
|- |
|- |
||
| + | |[https://apexps.fandom.com/wiki/AFK_Island ''AFK Island''] |
||
| − | | style="text-align: center; background-color:#fe0000; color:#ffffff;" | 2 |
||
| + | |[https://apexps.fandom.com/wiki/Golden_Equipment ''Golden Equipment''] |
||
| − | | style="text-align: center; background-color:#fe0000; color:#ffffff;" | Mind Runes |
||
| − | |- |
||
| − | | style="text-align: center; background-color:#fe0000; color:#ffffff;" | 5 |
||
| − | | style="text-align: center; background-color:#fe0000; color:#ffffff;" | Water Runes |
||
| − | |- |
||
| − | | style="text-align: center; background-color:#fe0000; color:#ffffff;" | 9 |
||
| − | | style="text-align: center; background-color:#fe0000; color:#ffffff;" | Earth Runes |
||
| − | |- |
||
| − | | style="text-align: center; background-color:#fe0000; color:#ffffff;" | 14 |
||
| − | | style="text-align: center; background-color:#fe0000; color:#ffffff;" | Fire Runes |
||
| − | |- |
||
| − | | style="text-align: center; background-color:#fe0000; color:#ffffff;" | 20 |
||
| − | | style="text-align: center; background-color:#fe0000; color:#ffffff;" | Body Runes |
||
| − | |- |
||
| − | | style="text-align: center; background-color:#fe0000; color:#ffffff;" | 27 |
||
| − | | style="text-align: center; background-color:#fe0000; color:#ffffff;" | Cosmic Runes |
||
| − | |- |
||
| − | | style="text-align: center; background-color:#fe0000; color:#ffffff;" | 35 |
||
| − | | style="text-align: center; background-color:#fe0000; color:#ffffff;" | Chaos Runes |
||
| − | |- |
||
| − | | style="text-align: center; background-color:#fe0000; color:#ffffff;" | 40 |
||
| − | | style="text-align: center; background-color:#fe0000; color:#ffffff;" | Astral Runes |
||
| − | |- |
||
| − | | style="text-align: center; background-color:#fe0000; color:#ffffff;" | 44 |
||
| − | | style="text-align: center; background-color:#fe0000; color:#ffffff;" | Nature Runes |
||
| − | |- |
||
| − | | style="text-align: center; background-color:#fe0000; color:#ffffff;" | 54 |
||
| − | | style="text-align: center; background-color:#fe0000; color:#ffffff;" | Law Runes |
||
| − | |- |
||
| − | | style="text-align: center; background-color:#fe0000; color:#ffffff;" | 65 |
||
| − | | style="text-align: center; background-color:#fe0000; color:#ffffff;" | Death Runes |
||
| − | |- |
||
| − | | style="text-align: center; background-color:#fe0000; color:#ffffff;" | 77 |
||
| − | | style="text-align: center; background-color:#fe0000; color:#ffffff;" | Blood Runes |
||
|} |
|} |
||
| + | </div> |
||
| + | <div class="center" style="width: auto; margin-left: auto; margin-right: auto;"> </div> |
||
| − | |-|Construction={|class="wikitable sortable" |
||
| − | Construction is a very simple and straightforward skill. You can start Construction by clicking on the workbench at home outside of the bank. By clicking on the workbench you will create random construction items such as wooden chairs and beds. These constructed items can be sold to the Builder for GP, this NPC is located next to the workbench. |
||
| + | ---- |
||
| − | [[File:Output-onlinepngtools.png|centre|thumb|450x450px]] |
||
| + | ==How to Start== |
||
| − | |-|Agility={|class="wikitable sortable" |
||
| − | '''Agility methods are listed worst to best EXP''' |
||
| − | === '''Gnome Agility Course''' === |
||
| − | You can access this course via the skilling teleport, upon completion of each round you will be rewarded with 1X Agility Ticket. Agility Tickets can either be left clicked for additional EXP or traded to the Agility Boss where you can purchase New Crystal Bows and Red Crystal Bows. |
||
| − | === '''Barbarian Course''' === |
||
| − | You can access this course via the skilling teleport, upon completion of each round you will be rewarded with 1X Agility Ticket. Agility Tickets can either be left clicked for additional EXP or traded to the Agility Boss where you can purchase New Crystal Bows and Red Crystal Bows. |
||
| − | === '''Member Zone Obstacle Pipe''' === |
||
| − | You can access the Obstacle Pipe by using a Membership Bond then typing ::mz. Once you are in the member zone go south. You can spam click the pipe and receive high amounts of EXP along with 3X Agility Tickets per click. |
||
| − | [[File: |
+ | [[File:SKilling5.png|centre|thumb|450x450px]] |
| + | ---- |
||
| − | |||
| + | == ''Tools'' == |
||
| − | |-|Herblore={|class="wikitable sortable" |
||
| + | ---- |
||
| − | Runecrafting is a skill in which players have the ability to clean herbs and make potions. You can purchase herblore secondary supplies from the Skilling Shops which are found at every skilling location teleport. |
||
| + | General skilling supplies can be purchased from the skilling shop named '''Store Emporium'''. |
||
| − | |||
| + | This store is located at home in the north-eastern building. |
||
| − | |||
| + | ---- |
||
| − | [[File:Jjghjgh.png|right|thumb|450x450px]] |
||
| + | [[File:Skilling|centre|thumb|450x450px]] |
||
| − | |||
| − | === '''Herb Cleaning''' === |
||
| − | {| class="wikitable" |
||
| − | ! style="text-align: center; font-weight:bold; background-color:#fe0000; color:#ffffff;" | LVL Required |
||
| − | ! style="text-align: center; font-weight:bold; background-color:#fe0000; color:#ffffff;" | Herb |
||
| − | |- |
||
| − | | style="text-align: center; background-color:#fe0000; color:#ffffff;" | 1 |
||
| − | | style="text-align: center; background-color:#fe0000; color:#ffffff;" | Guam leaf |
||
| − | |- |
||
| − | | style="text-align: center; background-color:#fe0000; color:#ffffff;" | 5 |
||
| − | | style="text-align: center; background-color:#fe0000; color:#ffffff;" | Marrentill |
||
| − | |- |
||
| − | | style="text-align: center; background-color:#fe0000; color:#ffffff;" | 11 |
||
| − | | style="text-align: center; background-color:#fe0000; color:#ffffff;" | Tarromin |
||
| − | |- |
||
| − | | style="text-align: center; background-color:#fe0000; color:#ffffff;" | 20 |
||
| − | | style="text-align: center; background-color:#fe0000; color:#ffffff;" | Harralander |
||
| − | |- |
||
| − | | style="text-align: center; background-color:#fe0000; color:#ffffff;" | 25 |
||
| − | | style="text-align: center; background-color:#fe0000; color:#ffffff;" | Ranarr weed |
||
| − | |- |
||
| − | | style="text-align: center; background-color:#fe0000; color:#ffffff;" | 30 |
||
| − | | style="text-align: center; background-color:#fe0000; color:#ffffff;" | Toadflax |
||
| − | |- |
||
| − | | style="text-align: center; background-color:#fe0000; color:#ffffff;" | 40 |
||
| − | | style="text-align: center; background-color:#fe0000; color:#ffffff;" | Irit leaf |
||
| − | |- |
||
| − | | style="text-align: center; background-color:#fe0000; color:#ffffff;" | 48 |
||
| − | | style="text-align: center; background-color:#fe0000; color:#ffffff;" | Avantoe |
||
| − | |- |
||
| − | | style="text-align: center; background-color:#fe0000; color:#ffffff;" | 54 |
||
| − | | style="text-align: center; background-color:#fe0000; color:#ffffff;" | Kwuarm |
||
| − | |- |
||
| − | | style="text-align: center; background-color:#fe0000; color:#ffffff;" | 59 |
||
| − | | style="text-align: center; background-color:#fe0000; color:#ffffff;" | Snapdragon |
||
| − | |- |
||
| − | | style="text-align: center; background-color:#fe0000; color:#ffffff;" | 65 |
||
| − | | style="text-align: center; background-color:#fe0000; color:#ffffff;" | Cadantine |
||
| − | |- |
||
| − | | style="text-align: center; background-color:#fe0000; color:#ffffff;" | 67 |
||
| − | | style="text-align: center; background-color:#fe0000; color:#ffffff;" | Lantadyme |
||
| − | |- |
||
| − | | style="text-align: center; background-color:#fe0000; color:#ffffff;" | 70 |
||
| − | | style="text-align: center; background-color:#fe0000; color:#ffffff;" | Dwarf weed |
||
| − | |- |
||
| − | | style="text-align: center; background-color:#fe0000; color:#ffffff;" | 75 |
||
| − | | style="text-align: center; background-color:#fe0000; color:#ffffff;" | Torstol |
||
| − | |} |
||
| − | |||
| − | === '''Potion Making''' === |
||
| − | {| class="wikitable" |
||
| − | ! style="text-align: center; font-weight:bold; background-color:#fe0000; color:#ffffff;" | LVL Required |
||
| − | ! style="text-align: center; font-weight:bold; background-color:#fe0000; color:#ffffff;" | Potion |
||
| − | ! style="text-align: center; font-weight:bold; background-color:#fe0000; color:#ffffff;" | Ingredients |
||
| − | |- |
||
| − | | style="text-align: center; background-color:#fe0000; color:#ffffff;" | 3 |
||
| − | | style="text-align: center; background-color:#fe0000; color:#ffffff;" | Attack potion |
||
| − | | style="text-align: center; background-color:#fe0000; color:#ffffff;" | Guam leaf & eye of newt |
||
| − | |- |
||
| − | | style="text-align: center; background-color:#fe0000; color:#ffffff;" | 5 |
||
| − | | style="text-align: center; background-color:#fe0000; color:#ffffff;" | Anti-poison potion |
||
| − | | style="text-align: center; background-color:#fe0000; color:#ffffff;" | Marrentill & ground unicorn horn |
||
| − | |- |
||
| − | | style="text-align: center; background-color:#fe0000; color:#ffffff;" | 12 |
||
| − | | style="text-align: center; background-color:#fe0000; color:#ffffff;" | Strength potion |
||
| − | | style="text-align: center; background-color:#fe0000; color:#ffffff;" | Tarromin & limpwurt root |
||
| − | |- |
||
| − | | style="text-align: center; background-color:#fe0000; color:#ffffff;" | 22 |
||
| − | | style="text-align: center; background-color:#fe0000; color:#ffffff;" | Stat restore potion |
||
| − | | style="text-align: center; background-color:#fe0000; color:#ffffff;" | Harralander & red spiders' eggs |
||
| − | |- |
||
| − | | style="text-align: center; background-color:#fe0000; color:#ffffff;" | 26 |
||
| − | | style="text-align: center; background-color:#fe0000; color:#ffffff;" | Energy potion |
||
| − | | style="text-align: center; background-color:#fe0000; color:#ffffff;" | Harralander & chocolate dust |
||
| − | |- |
||
| − | | style="text-align: center; background-color:#fe0000; color:#ffffff;" | 30 |
||
| − | | style="text-align: center; background-color:#fe0000; color:#ffffff;" | Defence potion |
||
| − | | style="text-align: center; background-color:#fe0000; color:#ffffff;" | Ranarr weed & white berries |
||
| − | |- |
||
| − | | style="text-align: center; background-color:#fe0000; color:#ffffff;" | 36 |
||
| − | | style="text-align: center; background-color:#fe0000; color:#ffffff;" | Combat potion |
||
| − | | style="text-align: center; background-color:#fe0000; color:#ffffff;" | Harralander & ground desert goat horn |
||
| − | |- |
||
| − | | style="text-align: center; background-color:#fe0000; color:#ffffff;" | 38 |
||
| − | | style="text-align: center; background-color:#fe0000; color:#ffffff;" | Prayer restore |
||
| − | | style="text-align: center; background-color:#fe0000; color:#ffffff;" | potion Ranarr weed & snape grass |
||
| − | |- |
||
| − | | style="text-align: center; background-color:#fe0000; color:#ffffff;" | 45 |
||
| − | | style="text-align: center; background-color:#fe0000; color:#ffffff;" | Super Attack potion |
||
| − | | style="text-align: center; background-color:#fe0000; color:#ffffff;" | Irit leaf & eye of newt |
||
| − | |- |
||
| − | | style="text-align: center; background-color:#fe0000; color:#ffffff;" | 48 |
||
| − | | style="text-align: center; background-color:#fe0000; color:#ffffff;" | Super anti-poison potion |
||
| − | | style="text-align: center; background-color:#fe0000; color:#ffffff;" | Irit leaf & ground unicorn horn |
||
| − | |- |
||
| − | | style="text-align: center; background-color:#fe0000; color:#ffffff;" | 55 |
||
| − | | style="text-align: center; background-color:#fe0000; color:#ffffff;" | Super Strength potion |
||
| − | | style="text-align: center; background-color:#fe0000; color:#ffffff;" | Kwuarm & limpwurt root |
||
| − | |- |
||
| − | | style="text-align: center; background-color:#fe0000; color:#ffffff;" | 63 |
||
| − | | style="text-align: center; background-color:#fe0000; color:#ffffff;" | Super restore potion |
||
| − | | style="text-align: center; background-color:#fe0000; color:#ffffff;" | Snapdragon & red spiders' eggs |
||
| − | |- |
||
| − | | style="text-align: center; background-color:#fe0000; color:#ffffff;" | 66 |
||
| − | | style="text-align: center; background-color:#fe0000; color:#ffffff;" | Super Defence potion |
||
| − | | style="text-align: center; background-color:#fe0000; color:#ffffff;" | Cadantine & white berries |
||
| − | |- |
||
| − | | style="text-align: center; background-color:#fe0000; color:#ffffff;" | 72 |
||
| − | | style="text-align: center; background-color:#fe0000; color:#ffffff;" | Ranging potion |
||
| − | | style="text-align: center; background-color:#fe0000; color:#ffffff;" | Dwarf weed & wine of Zamorak |
||
| − | |- |
||
| − | | style="text-align: center; background-color:#fe0000; color:#ffffff;" | 76 |
||
| − | | style="text-align: center; background-color:#fe0000; color:#ffffff;" | Magic Potion |
||
| − | | style="text-align: center; background-color:#fe0000; color:#ffffff;" | Lantadyme & potato cactus |
||
| − | |- |
||
| − | | style="text-align: center; background-color:#fe0000; color:#ffffff;" | 78 |
||
| − | | style="text-align: center; background-color:#fe0000; color:#ffffff;" | Zamorak Potion |
||
| − | | style="text-align: center; background-color:#fe0000; color:#ffffff;" | Torstol & Jangerberries |
||
| − | |- |
||
| − | | style="text-align: center; background-color:#fe0000; color:#ffffff;" | 81 |
||
| − | | style="text-align: center; background-color:#fe0000; color:#ffffff;" | Saradomin brew |
||
| − | | style="text-align: center; background-color:#fe0000; color:#ffffff;" | Toadflax & crushed birdnest |
||
| − | |- |
||
| − | | style="text-align: center; background-color:#fe0000; color:#ffffff;" | 95 |
||
| − | | style="text-align: center; background-color:#fe0000; color:#ffffff;" | Overload Overload |
||
| − | | style="text-align: center; background-color:#fe0000; color:#ffffff;" | Scroll from Vote Store + 1X of Super attack + Strength + Defence + Magic + Ranging potion and Torstol |
||
| − | |} |
||
| − | | |
||
| − | |||
| − | |-|Thieving={|class="wikitable sortable" |
||
| − | [[File:Thieving1.png|centre|thumb|450x450px]] |
||
| − | Thieving is often considered a viable option to obtain stater GP. Thieving stalls can be accessed outside the home bank, below are the level requirements for each one: |
||
| − | |||
| − | |||
| − | Players have a 1:250 chance to receive a [[Stolen Invitation]] which is needed to access Thieving Madness located in [[Money Making]] teleport. Thieving madness is quite rewarding and can yield around 15-20B per [[Stolen Invitation]], this can take around 10 minutes to obtain these estimated amounts. |
||
| − | |||
| − | === '''Thieving Stalls''' === |
||
| − | {| class="wikitable" |
||
| − | ! style="text-align: center; font-weight:bold; background-color:#cb0000; color:#ffffff;" | LVL Required |
||
| − | ! style="text-align: center; font-weight:bold; background-color:#cb0000; color:#ffffff;" | Thieving Stall |
||
| − | ! style="text-align: center; font-weight:bold; background-color:#cb0000; color:#ffffff;" | GP Thieved |
||
| − | |- |
||
| − | | style="text-align: center; background-color:#cb0000; color:#ffffff;" | 1 |
||
| − | | style="text-align: center; background-color:#cb0000; color:#ffffff;" | Nooby Stall (Crafting stall #1) |
||
| − | | style="text-align: center; background-color:#cb0000; color:#ffffff;" | 1,000,000 GP |
||
| − | |- |
||
| − | | style="text-align: center; background-color:#cb0000; color:#ffffff;" | 25 |
||
| − | | style="text-align: center; background-color:#cb0000; color:#ffffff;" | Rookie Stall (Banana stall) |
||
| − | | style="text-align: center; background-color:#cb0000; color:#ffffff;" | 1,500,000 GP |
||
| − | |- |
||
| − | | style="text-align: center; background-color:#cb0000; color:#ffffff;" | 50 |
||
| − | | style="text-align: center; background-color:#cb0000; color:#ffffff;" | Intermediate Stall (Crafting stall #2) |
||
| − | | style="text-align: center; background-color:#cb0000; color:#ffffff;" | 2,000,000 GP |
||
| − | |- |
||
| − | | style="text-align: center; background-color:#cb0000; color:#ffffff;" | 75 |
||
| − | | style="text-align: center; background-color:#cb0000; color:#ffffff;" | Professional Stall (Rune stall) |
||
| − | | style="text-align: center; background-color:#cb0000; color:#ffffff;" | 2,500,000 GP |
||
| − | |- |
||
| − | | style="text-align: center; background-color:#cb0000; color:#ffffff;" | 90 |
||
| − | | style="text-align: center; background-color:#cb0000; color:#ffffff;" | Expert Stall (Scimitar stall) |
||
| − | | style="text-align: center; background-color:#cb0000; color:#ffffff;" | 3,250,000 GP |
||
| − | |- |
||
| − | | style="text-align: center; background-color:#cb0000; color:#ffffff;" | 90 |
||
| − | | style="text-align: center; background-color:#cb0000; color:#ffffff;" | Gem Stall |
||
| − | | style="text-align: center; background-color:#cb0000; color:#ffffff;" | 3,500,000 GP |
||
| − | |} |
||
| − | |||
| − | |||
| − | |-|Crafting={|class="wikitable sortable" |
||
| − | Crafting is a straight forward skill and the easiest way to obtain 99 is simply cutting uncut gems. To purchase uncut gems go to the crafting teleport then buy the gems from Thessalia. Ironmen are only able to purchase uncut dragonstones from this NPC but are able to obtain uncut sapphires, emeralds, rubies, and diamonds from rock crabs. |
||
| − | |||
| − | [[File:Onyx_amulet_detail.png|left|thumb|450x450px]] |
||
| − | |||
| − | === '''Gem Cutting''' === |
||
| − | {| class="wikitable" |
||
| − | ! style="text-align: center; font-weight:bold; background-color:#fe0000; color:#ffffff;" | LVL Required |
||
| − | ! style="text-align: center; font-weight:bold; background-color:#fe0000; color:#ffffff;" | Uncut Gems |
||
| − | |- |
||
| − | | style="text-align: center; background-color:#fe0000; color:#ffffff;" | 1 |
||
| − | | style="text-align: center; background-color:#fe0000; color:#ffffff;" | Uncut Sapphire |
||
| − | |- |
||
| − | | style="text-align: center; background-color:#fe0000; color:#ffffff;" | 27 |
||
| − | | style="text-align: center; background-color:#fe0000; color:#ffffff;" | Uncut Emerald |
||
| − | |- |
||
| − | | style="text-align: center; background-color:#fe0000; color:#ffffff;" | 34 |
||
| − | | style="text-align: center; background-color:#fe0000; color:#ffffff;" | Uncut Ruby |
||
| − | |- |
||
| − | | style="text-align: center; background-color:#fe0000; color:#ffffff;" | 43 |
||
| − | | style="text-align: center; background-color:#fe0000; color:#ffffff;" | Uncut Diamond |
||
| − | |- |
||
| − | | style="text-align: center; background-color:#fe0000; color:#ffffff;" | 55 |
||
| − | | style="text-align: center; background-color:#fe0000; color:#ffffff;" | Uncut Dragonstone |
||
| − | |- |
||
| − | | style="text-align: center; background-color:#fe0000; color:#ffffff;" | 67 |
||
| − | | style="text-align: center; background-color:#fe0000; color:#ffffff;" | Uncut Onyx |
||
| − | |} |
||
| − | |||
| − | === '''Jewelry Making''' === |
||
| − | {| class="wikitable" |
||
| − | ! style="text-align: center; font-weight:bold; background-color:#fe0000; color:#ffffff;" | LVL Required |
||
| − | ! style="text-align: center; font-weight:bold; background-color:#fe0000; color:#ffffff;" | Gem Type |
||
| − | ! style="text-align: center; font-weight:bold; background-color:#fe0000; color:#ffffff;" | Jewelry & LVL |
||
| − | |- |
||
| − | | style="text-align: center; background-color:#fe0000; color:#ffffff;" | 1 |
||
| − | | style="text-align: center; background-color:#fe0000; color:#ffffff;" | Sapphire |
||
| − | | style="text-align: center; background-color:#fe0000; color:#ffffff;" | Ring(20) or Amulet(24) or Necklace(22) |
||
| − | |- |
||
| − | | style="text-align: center; background-color:#fe0000; color:#ffffff;" | 27 |
||
| − | | style="text-align: center; background-color:#fe0000; color:#ffffff;" | Emerald |
||
| − | | style="text-align: center; background-color:#fe0000; color:#ffffff;" | Ring(27) or Amulet(31) or Necklace(29) |
||
| − | |- |
||
| − | | style="text-align: center; background-color:#fe0000; color:#ffffff;" | 34 |
||
| − | | style="text-align: center; background-color:#fe0000; color:#ffffff;" | Ruby |
||
| − | | style="text-align: center; background-color:#fe0000; color:#ffffff;" | Ring(34) or Amulet(50) or Necklace(40) |
||
| − | |- |
||
| − | | style="text-align: center; background-color:#fe0000; color:#ffffff;" | 43 |
||
| − | | style="text-align: center; background-color:#fe0000; color:#ffffff;" | Diamond |
||
| − | | style="text-align: center; background-color:#fe0000; color:#ffffff;" | Ring(43) or Amulet(70) or Necklace(56) |
||
| − | |- |
||
| − | | style="text-align: center; background-color:#fe0000; color:#ffffff;" | 55 |
||
| − | | style="text-align: center; background-color:#fe0000; color:#ffffff;" | Dragonstone |
||
| − | | style="text-align: center; background-color:#fe0000; color:#ffffff;" | Ring(55) or Amulet(80) or Necklace(72) |
||
| − | |- |
||
| − | | style="text-align: center; background-color:#fe0000; color:#ffffff;" | 67 |
||
| − | | style="text-align: center; background-color:#fe0000; color:#ffffff;" | Onyx |
||
| − | | style="text-align: center; background-color:#fe0000; color:#ffffff;" | Ring(67) or Amulet(82) or Necklace(90) |
||
| − | |} |
||
| − | |||
| − | |||
| − | |-|Fletching={|class="wikitable sortable" |
||
| − | Fletching gives players the ability to make bows, arrows, and bolts. These items are used in the combat skill Range. You can purchase a knife from the skilling shop located at any of the skilling locations, players will have to obtain logs through other players, drops, or by the woodcutting skill. To purchase uncut gems go to the crafting teleport then buy the gems from Thessalia. Ironmen are only able to purchase uncut dragonstones from this NPC but are able to obtain uncut sapphires, emeralds, rubies, and diamonds from rock crabs. |
||
| − | |||
| − | [[File:Fletching.png|centre|thumb|450x450px]] |
||
| − | |||
| − | === '''Fletching Bows''' === |
||
| − | {| class="wikitable" |
||
| − | ! style="text-align: center; background-color:#fe0000; color:#ffffff;" | LVL Required |
||
| − | ! style="text-align: center; background-color:#fe0000; color:#ffffff;" | Log Type |
||
| − | ! style="text-align: center; background-color:#fe0000; color:#ffffff;" | Bow Type |
||
| − | |- |
||
| − | | style="text-align: center; background-color:#fe0000; color:#ffffff;" | 1 |
||
| − | | style="text-align: center; background-color:#fe0000; color:#ffffff;" | Logs |
||
| − | | style="text-align: center; background-color:#fe0000; color:#ffffff;" | 15X Arrow shaft |
||
| − | |- |
||
| − | | style="text-align: center; background-color:#fe0000; color:#ffffff;" | 5 |
||
| − | | style="text-align: center; background-color:#fe0000; color:#ffffff;" | Logs |
||
| − | | style="text-align: center; background-color:#fe0000; color:#ffffff;" | Shortbow/Longbow |
||
| − | |- |
||
| − | | style="text-align: center; background-color:#fe0000; color:#ffffff;" | 20 |
||
| − | | style="text-align: center; background-color:#fe0000; color:#ffffff;" | Oak Logs |
||
| − | | style="text-align: center; background-color:#fe0000; color:#ffffff;" | Oak Shortbow/Longbow |
||
| − | |- |
||
| − | | style="text-align: center; background-color:#fe0000; color:#ffffff;" | 35 |
||
| − | | style="text-align: center; background-color:#fe0000; color:#ffffff;" | Willow Logs |
||
| − | | style="text-align: center; background-color:#fe0000; color:#ffffff;" | Willow Shortbow/Longbow |
||
| − | |- |
||
| − | | style="text-align: center; background-color:#fe0000; color:#ffffff;" | 50 |
||
| − | | style="text-align: center; background-color:#fe0000; color:#ffffff;" | Maple Logs |
||
| − | | style="text-align: center; background-color:#fe0000; color:#ffffff;" | Maple Shortbow/Longbow |
||
| − | |- |
||
| − | | style="text-align: center; background-color:#fe0000; color:#ffffff;" | 65 |
||
| − | | style="text-align: center; background-color:#fe0000; color:#ffffff;" | Yew Logs |
||
| − | | style="text-align: center; background-color:#fe0000; color:#ffffff;" | Yew Shortbow/Longbow |
||
| − | |- |
||
| − | | style="text-align: center; background-color:#fe0000; color:#ffffff;" | 80 |
||
| − | | style="text-align: center; background-color:#fe0000; color:#ffffff;" | Magic Logs |
||
| − | | style="text-align: center; background-color:#fe0000; color:#ffffff;" | Magic Shortbow/Longbow |
||
| − | |} |
||
| − | |||
| − | === '''Bolt Tips''' === |
||
| − | {| class="wikitable" |
||
| − | ! style="text-align: center; font-weight:bold; background-color:#fe0000; color:#ffffff;" | LVL Required |
||
| − | ! style="text-align: center; font-weight:bold; background-color:#fe0000; color:#ffffff;" | Gem Type |
||
| − | ! style="text-align: center; font-weight:bold; background-color:#fe0000; color:#ffffff;" | Bolt Type |
||
| − | |- |
||
| − | | style="text-align: center; background-color:#fe0000; color:#ffffff;" | 65 |
||
| − | | style="text-align: center; background-color:#fe0000; color:#ffffff;" | Sapphire |
||
| − | | style="text-align: center; background-color:#fe0000; color:#ffffff;" | 10X Sapphire Bolt Tips |
||
| − | |- |
||
| − | | style="text-align: center; background-color:#fe0000; color:#ffffff;" | 71 |
||
| − | | style="text-align: center; background-color:#fe0000; color:#ffffff;" | Emerald |
||
| − | | style="text-align: center; background-color:#fe0000; color:#ffffff;" | 10X Emerald Bolt Tips |
||
| − | |- |
||
| − | | style="text-align: center; background-color:#fe0000; color:#ffffff;" | 73 |
||
| − | | style="text-align: center; background-color:#fe0000; color:#ffffff;" | Ruby |
||
| − | | style="text-align: center; background-color:#fe0000; color:#ffffff;" | 10X Ruby Bolt Tips |
||
| − | |- |
||
| − | | style="text-align: center; background-color:#fe0000; color:#ffffff;" | 63 |
||
| − | | style="text-align: center; background-color:#fe0000; color:#ffffff;" | Diamond |
||
| − | | style="text-align: center; background-color:#fe0000; color:#ffffff;" | 10X Diamond Bolt Tips |
||
| − | |- |
||
| − | | style="text-align: center; background-color:#fe0000; color:#ffffff;" | 73 |
||
| − | | style="text-align: center; background-color:#fe0000; color:#ffffff;" | Dragonstone |
||
| − | | style="text-align: center; background-color:#fe0000; color:#ffffff;" | 10X Dragonstone Bolt Tips |
||
| − | |- |
||
| − | | style="text-align: center; background-color:#fe0000; color:#ffffff;" | 73 |
||
| − | | style="text-align: center; background-color:#fe0000; color:#ffffff;" | Onyx |
||
| − | | style="text-align: center; background-color:#fe0000; color:#ffffff;" | 10X Onyx Bolt Tips |
||
| − | |} |
||
| − | |||
| − | |||
| − | |||
| − | |-|Slayer={|class="wikitable sortable" |
||
| − | |||
| − | [[File:636311326049773956-UC.jpg|center|thumb|450x450px]] |
||
| − | |||
| − | |-|Hunter={|class="wikitable sortable" |
||
| − | Hunter is a skill in which players have the ability to catch various NPC's either by box trap or a butterfly net and impling jar. These hunter supplies can be purchased from any skilling shop located at any skilling location. |
||
| − | |||
| − | [[File:Red_chinchompa_detail.png|right|thumb|450x450px]] |
||
| − | |||
| − | === '''Huntable NPC's''' === |
||
| − | {| class="wikitable" |
||
| − | ! style="font-weight:bold; background-color:#fe0000; color:#ffffff;" | LVL Required |
||
| − | ! style="font-weight:bold; background-color:#fe0000; color:#ffffff;" | Type |
||
| − | ! style="font-weight:bold; background-color:#fe0000; color:#ffffff;" | Item(s) Required |
||
| − | |- |
||
| − | | style="background-color:#fe0000; color:#ffffff;" | 1 |
||
| − | | style="background-color:#fe0000; color:#ffffff;" | Baby Impling |
||
| − | | style="background-color:#fe0000; color:#ffffff;" | Butterfly Net & Impling Jar |
||
| − | |- |
||
| − | | style="background-color:#fe0000; color:#ffffff;" | 17 |
||
| − | | style="background-color:#fe0000; color:#ffffff;" | Young Impling |
||
| − | | style="background-color:#fe0000; color:#ffffff;" | Butterfly Net & Impling Jar |
||
| − | |- |
||
| − | | style="background-color:#fe0000; color:#ffffff;" | 20 |
||
| − | | style="background-color:#fe0000; color:#ffffff;" | Gourmet Impling |
||
| − | | style="background-color:#fe0000; color:#ffffff;" | Butterfly Net & Impling Jar |
||
| − | |- |
||
| − | | style="background-color:#fe0000; color:#ffffff;" | 40 |
||
| − | | style="background-color:#fe0000; color:#ffffff;" | Essence Impling |
||
| − | | style="background-color:#fe0000; color:#ffffff;" | Butterfly Net & Impling Jar |
||
| − | |- |
||
| − | | style="background-color:#fe0000; color:#ffffff;" | 50 |
||
| − | | style="background-color:#fe0000; color:#ffffff;" | Electric Impling |
||
| − | | style="background-color:#fe0000; color:#ffffff;" | Butterfly Net & Impling Jar |
||
| − | |- |
||
| − | | style="background-color:#fe0000; color:#ffffff;" | 58 |
||
| − | | style="background-color:#fe0000; color:#ffffff;" | Nature Impling |
||
| − | | style="background-color:#fe0000; color:#ffffff;" | Butterfly Net & Impling Jar |
||
| − | |- |
||
| − | | style="background-color:#fe0000; color:#ffffff;" | 63 |
||
| − | | style="background-color:#fe0000; color:#ffffff;" | Red Chinchompa |
||
| − | | style="background-color:#fe0000; color:#ffffff;" | Box trap |
||
| − | |- |
||
| − | | style="background-color:#fe0000; color:#ffffff;" | 65 |
||
| − | | style="background-color:#fe0000; color:#ffffff;" | Magpie Impling |
||
| − | | style="background-color:#fe0000; color:#ffffff;" | Butterfly Net & Impling Jar |
||
| − | |- |
||
| − | | style="background-color:#fe0000; color:#ffffff;" | 74 |
||
| − | | style="background-color:#fe0000; color:#ffffff;" | Ninja Impling |
||
| − | | style="background-color:#fe0000; color:#ffffff;" | Butterfly Net & Impling Jar |
||
| − | |- |
||
| − | | style="background-color:#fe0000; color:#ffffff;" | 90 |
||
| − | | style="background-color:#fe0000; color:#ffffff;" | Dragon Impling |
||
| − | | style="background-color:#fe0000; color:#ffffff;" | Butterfly Net & Impling Jar |
||
| − | |} |
||
| − | |||
| − | |||
| − | |-|Mining={|class="wikitable sortable" |
||
| − | Players are able to purchase iron and rune pickaxes from the skilling shop found at any skilling location. You are able to purchase a Dragon Pickaxe from the [[Skilling Point Shop]] for 8,000 Skilling Points. |
||
| − | |||
| − | |||
| − | [[File:Iron_rock.png|right|thumb|450x450px]] |
||
| − | === '''Mineable Rocks''' === |
||
| − | {| class="wikitable" |
||
| − | ! style="text-align: center; font-weight:bold; background-color:#fe0000; color:#ffffff;" | LVL Required |
||
| − | ! style="text-align: center; font-weight:bold; background-color:#fe0000; color:#ffffff;" | Mineable Rocks |
||
| − | |- |
||
| − | | style="text-align: center; background-color:#fe0000; color:#ffffff;" | 1 |
||
| − | | style="text-align: center; background-color:#fe0000; color:#ffffff;" | Crashed Star |
||
| − | |- |
||
| − | | style="text-align: center; background-color:#fe0000; color:#ffffff;" | 1 |
||
| − | | style="text-align: center; background-color:#fe0000; color:#ffffff;" | Copper |
||
| − | |- |
||
| − | | style="text-align: center; background-color:#fe0000; color:#ffffff;" | 1 |
||
| − | | style="text-align: center; background-color:#fe0000; color:#ffffff;" | Tin |
||
| − | |- |
||
| − | | style="text-align: center; background-color:#fe0000; color:#ffffff;" | 15 |
||
| − | | style="text-align: center; background-color:#fe0000; color:#ffffff;" | Iron |
||
| − | |- |
||
| − | | style="text-align: center; background-color:#fe0000; color:#ffffff;" | 30 |
||
| − | | style="text-align: center; background-color:#fe0000; color:#ffffff;" | Coal |
||
| − | |- |
||
| − | | style="text-align: center; background-color:#fe0000; color:#ffffff;" | 40 |
||
| − | | style="text-align: center; background-color:#fe0000; color:#ffffff;" | Gold |
||
| − | |- |
||
| − | | style="text-align: center; background-color:#fe0000; color:#ffffff;" | 55 |
||
| − | | style="text-align: center; background-color:#fe0000; color:#ffffff;" | Mithril |
||
| − | |- |
||
| − | | style="text-align: center; background-color:#fe0000; color:#ffffff;" | 70 |
||
| − | | style="text-align: center; background-color:#fe0000; color:#ffffff;" | Adamant |
||
| − | |- |
||
| − | | style="text-align: center; background-color:#fe0000; color:#ffffff;" | 85 |
||
| − | | style="text-align: center; background-color:#fe0000; color:#ffffff;" | Runite |
||
| − | |} |
||
| − | |||
| − | |-|Smithing={|class="wikitable sortable" |
||
| − | |||
| − | |||
| − | [[File:Anvil.png|right|thumb|450x450px]] |
||
| − | === '''Smelting''' === |
||
| − | {| class="wikitable" |
||
| − | ! style="text-align: center; font-weight:bold; background-color:#fe0000; color:#ffffff;" | LVL Required |
||
| − | ! style="text-align: center; font-weight:bold; background-color:#fe0000; color:#ffffff;" | Mineable Rocks |
||
| − | |- |
||
| − | | style="text-align: center; background-color:#fe0000; color:#ffffff;" | 1 |
||
| − | | style="text-align: center; background-color:#fe0000; color:#ffffff;" | Crashed Star |
||
| − | |- |
||
| − | | style="text-align: center; background-color:#fe0000; color:#ffffff;" | 1 |
||
| − | | style="text-align: center; background-color:#fe0000; color:#ffffff;" | Copper |
||
| − | |- |
||
| − | | style="text-align: center; background-color:#fe0000; color:#ffffff;" | 1 |
||
| − | | style="text-align: center; background-color:#fe0000; color:#ffffff;" | Tin |
||
| − | |- |
||
| − | | style="text-align: center; background-color:#fe0000; color:#ffffff;" | 15 |
||
| − | | style="text-align: center; background-color:#fe0000; color:#ffffff;" | Iron |
||
| − | |- |
||
| − | | style="text-align: center; background-color:#fe0000; color:#ffffff;" | 30 |
||
| − | | style="text-align: center; background-color:#fe0000; color:#ffffff;" | Coal |
||
| − | |- |
||
| − | | style="text-align: center; background-color:#fe0000; color:#ffffff;" | 40 |
||
| − | | style="text-align: center; background-color:#fe0000; color:#ffffff;" | Gold |
||
| − | |- |
||
| − | | style="text-align: center; background-color:#fe0000; color:#ffffff;" | 55 |
||
| − | | style="text-align: center; background-color:#fe0000; color:#ffffff;" | Mithril |
||
| − | |- |
||
| − | | style="text-align: center; background-color:#fe0000; color:#ffffff;" | 70 |
||
| − | | style="text-align: center; background-color:#fe0000; color:#ffffff;" | Adamant |
||
| − | |- |
||
| − | | style="text-align: center; background-color:#fe0000; color:#ffffff;" | 85 |
||
| − | | style="text-align: center; background-color:#fe0000; color:#ffffff;" | Runite |
||
| − | |} |
||
| − | |||
| − | |||
| − | |||
| − | |-|Fishing={|class="wikitable sortable" |
||
| − | Players are able to purchase fishing equipment from the skilling shop found at any skilling location. |
||
| − | |||
| − | [[File:Fishing_rod_detail.png|right|thumb|450x450px]] |
||
| − | === '''Fishing Spots''' === |
||
| − | {| class="wikitable" |
||
| − | ! style="text-align: center; font-weight:bold; background-color:#fe0000; color:#ffffff;" | LVL Required |
||
| − | ! style="text-align: center; font-weight:bold; background-color:#fe0000; color:#ffffff;" | Fishing Equipment |
||
| − | ! style="text-align: center; font-weight:bold; background-color:#fe0000; color:#ffffff;" | Fish |
||
| − | |- |
||
| − | | style="text-align: center; background-color:#fe0000; color:#ffffff;" | 1 |
||
| − | | style="text-align: center; background-color:#fe0000; color:#ffffff;" | Small Fishing Net |
||
| − | | style="text-align: center; background-color:#fe0000; color:#ffffff;" | Shrimp |
||
| − | |- |
||
| − | | style="text-align: center; background-color:#fe0000; color:#ffffff;" | 1 |
||
| − | | style="text-align: center; background-color:#fe0000; color:#ffffff;" | Small Fishing Net |
||
| − | | style="text-align: center; background-color:#fe0000; color:#ffffff;" | Karambwan |
||
| − | |- |
||
| − | | style="text-align: center; background-color:#fe0000; color:#ffffff;" | 35 |
||
| − | | style="text-align: center; background-color:#fe0000; color:#ffffff;" | Harpoon |
||
| − | | style="text-align: center; background-color:#fe0000; color:#ffffff;" | Tuna |
||
| − | |- |
||
| − | | style="text-align: center; background-color:#fe0000; color:#ffffff;" | 40 |
||
| − | | style="text-align: center; background-color:#fe0000; color:#ffffff;" | Lobster Pot |
||
| − | | style="text-align: center; background-color:#fe0000; color:#ffffff;" | Lobster |
||
| − | |- |
||
| − | | style="text-align: center; background-color:#fe0000; color:#ffffff;" | 50 |
||
| − | | style="text-align: center; background-color:#fe0000; color:#ffffff;" | Harpoon |
||
| − | | style="text-align: center; background-color:#fe0000; color:#ffffff;" | Swordfish |
||
| − | |- |
||
| − | | style="text-align: center; background-color:#fe0000; color:#ffffff;" | 76 |
||
| − | | style="text-align: center; background-color:#fe0000; color:#ffffff;" | Harpoon |
||
| − | | style="text-align: center; background-color:#fe0000; color:#ffffff;" | Shark |
||
| − | |- |
||
| − | | style="text-align: center; background-color:#fe0000; color:#ffffff;" | 90 |
||
| − | | style="text-align: center; background-color:#fe0000; color:#ffffff;" | Fly Fishing Rod |
||
| − | | style="text-align: center; background-color:#fe0000; color:#ffffff;" | Rocktail |
||
| − | |} |
||
| − | |||
| − | |||
| − | |-|Cooking={|class="wikitable sortable" |
||
| − | |||
| − | [[File:Steel_range_built.png|right|thumb|450x450px]] |
||
| − | === '''Cooking''' === |
||
| − | {| class="wikitable" |
||
| − | ! style="text-align: center; font-weight:bold; background-color:#fe0000; color:#ffffff;" | LVL Required |
||
| − | ! style="text-align: center; font-weight:bold; background-color:#fe0000; color:#ffffff;" | Fish |
||
| − | |- |
||
| − | | style="text-align: center; background-color:#fe0000; color:#ffffff;" | 1 |
||
| − | | style="text-align: center; background-color:#fe0000; color:#ffffff;" | Shrimp |
||
| − | |- |
||
| − | | style="text-align: center; background-color:#fe0000; color:#ffffff;" | 1 |
||
| − | | style="text-align: center; background-color:#fe0000; color:#ffffff;" | Karambwan |
||
| − | |- |
||
| − | | style="text-align: center; background-color:#fe0000; color:#ffffff;" | 30 |
||
| − | | style="text-align: center; background-color:#fe0000; color:#ffffff;" | Tuna |
||
| − | |- |
||
| − | | style="text-align: center; background-color:#fe0000; color:#ffffff;" | 40 |
||
| − | | style="text-align: center; background-color:#fe0000; color:#ffffff;" | Lobster |
||
| − | |- |
||
| − | | style="text-align: center; background-color:#fe0000; color:#ffffff;" | 45 |
||
| − | | style="text-align: center; background-color:#fe0000; color:#ffffff;" | Swordfish |
||
| − | |- |
||
| − | | style="text-align: center; background-color:#fe0000; color:#ffffff;" | 80 |
||
| − | | style="text-align: center; background-color:#fe0000; color:#ffffff;" | Shark |
||
| − | |- |
||
| − | | style="text-align: center; background-color:#fe0000; color:#ffffff;" | 90 |
||
| − | | style="text-align: center; background-color:#fe0000; color:#ffffff;" | Rocktail |
||
| − | |} |
||
| − | |||
| − | |||
| − | |-|Firemaking={|class="wikitable sortable" |
||
| − | |||
| − | [[File:Tinderbox_detail.png|right|thumb|350x350px]] |
||
| − | === ''Firemaking''' === |
||
| − | {| class="wikitable" |
||
| − | ! style="text-align: center; font-weight:bold; background-color:#fe0000; color:#ffffff;" | LVL Required |
||
| − | ! style="text-align: center; font-weight:bold; background-color:#fe0000; color:#ffffff;" | Log |
||
| − | |- |
||
| − | | style="text-align: center; background-color:#fe0000; color:#ffffff;" | 1 |
||
| − | | style="text-align: center; background-color:#fe0000; color:#ffffff;" | Logs |
||
| − | |- |
||
| − | | style="text-align: center; background-color:#fe0000; color:#ffffff;" | 15 |
||
| − | | style="text-align: center; background-color:#fe0000; color:#ffffff;" | Oak Logs |
||
| − | |- |
||
| − | | style="text-align: center; background-color:#fe0000; color:#ffffff;" | 30 |
||
| − | | style="text-align: center; background-color:#fe0000; color:#ffffff;" | Willow Logs |
||
| − | |- |
||
| − | | style="text-align: center; background-color:#fe0000; color:#ffffff;" | 45 |
||
| − | | style="text-align: center; background-color:#fe0000; color:#ffffff;" | Maple Logs |
||
| − | |- |
||
| − | | style="text-align: center; background-color:#fe0000; color:#ffffff;" | 60 |
||
| − | | style="text-align: center; background-color:#fe0000; color:#ffffff;" | Yew Logs |
||
| − | |- |
||
| − | | style="text-align: center; background-color:#fe0000; color:#ffffff;" | 75 |
||
| − | | style="text-align: center; background-color:#fe0000; color:#ffffff;" | Magic Logs |
||
| − | |} |
||
| − | |||
| − | |-|Woodcutting={|class="wikitable sortable" |
||
| − | Players are able to purchase iron and rune axes from the skilling shop found at any skilling location. You are able to purchase a Dragon Axe from the [[Skilling Point Shop]] for 8,000 Skilling Points. |
||
| − | |||
| − | |||
| − | [[File:Lumberjack_Leif.gif|right]] |
||
| − | === ''Woodcutting''' === |
||
| − | {| class="wikitable" |
||
| − | ! style="text-align: center; font-weight:bold; background-color:#fe0000; color:#ffffff;" | LVL Required |
||
| − | ! style="text-align: center; font-weight:bold; background-color:#fe0000; color:#ffffff;" | Tree |
||
| − | |- |
||
| − | | style="text-align: center; background-color:#fe0000; color:#ffffff;" | 1 |
||
| − | | style="text-align: center; background-color:#fe0000; color:#ffffff;" | Tree |
||
| − | |- |
||
| − | | style="text-align: center; background-color:#fe0000; color:#ffffff;" | 15 |
||
| − | | style="text-align: center; background-color:#fe0000; color:#ffffff;" | Oak Tree |
||
| − | |- |
||
| − | | style="text-align: center; background-color:#fe0000; color:#ffffff;" | 30 |
||
| − | | style="text-align: center; background-color:#fe0000; color:#ffffff;" | Willow Tree |
||
| − | |- |
||
| − | | style="text-align: center; background-color:#fe0000; color:#ffffff;" | 45 |
||
| − | | style="text-align: center; background-color:#fe0000; color:#ffffff;" | Maple Tree |
||
| − | |- |
||
| − | | style="text-align: center; background-color:#fe0000; color:#ffffff;" | 60 |
||
| − | | style="text-align: center; background-color:#fe0000; color:#ffffff;" | Yew Tree |
||
| − | |- |
||
| − | | style="text-align: center; background-color:#fe0000; color:#ffffff;" | 75 |
||
| − | | style="text-align: center; background-color:#fe0000; color:#ffffff;" | Magic Tree |
||
| − | |} |
||
| − | |||
| − | |-|Farming={|class="wikitable sortable" |
||
| − | |||
| − | [[File:Farming_herbs.gif|right]] |
||
| − | === ''Herb Patches''' === |
||
| − | {| class="wikitable" |
||
| − | ! style="text-align: center; font-weight:bold; background-color:#fe0000; color:#ffffff;" | LVL Required |
||
| − | ! style="text-align: center; font-weight:bold; background-color:#fe0000; color:#ffffff;" | Seed |
||
| − | |- |
||
| − | | style="text-align: center; background-color:#fe0000; color:#ffffff;" | 9 |
||
| − | | style="text-align: center; background-color:#fe0000; color:#ffffff;" | Guam |
||
| − | |- |
||
| − | | style="text-align: center; background-color:#fe0000; color:#ffffff;" | 14 |
||
| − | | style="text-align: center; background-color:#fe0000; color:#ffffff;" | Marrentill |
||
| − | |- |
||
| − | | style="text-align: center; background-color:#fe0000; color:#ffffff;" | 19 |
||
| − | | style="text-align: center; background-color:#fe0000; color:#ffffff;" | Tarromin |
||
| − | |- |
||
| − | | style="text-align: center; background-color:#fe0000; color:#ffffff;" | 26 |
||
| − | | style="text-align: center; background-color:#fe0000; color:#ffffff;" | Harralander |
||
| − | |- |
||
| − | | style="text-align: center; background-color:#fe0000; color:#ffffff;" | 32 |
||
| − | | style="text-align: center; background-color:#fe0000; color:#ffffff;" | Ranarr |
||
| − | |- |
||
| − | | style="text-align: center; background-color:#fe0000; color:#ffffff;" | 38 |
||
| − | | style="text-align: center; background-color:#fe0000; color:#ffffff;" | Toadflax |
||
| − | |- |
||
| − | | style="text-align: center; background-color:#fe0000; color:#ffffff;" | 44 |
||
| − | | style="text-align: center; background-color:#fe0000; color:#ffffff;" | Irit |
||
| − | |- |
||
| − | | style="text-align: center; background-color:#fe0000; color:#ffffff;" | 50 |
||
| − | | style="text-align: center; background-color:#fe0000; color:#ffffff;" | Avantoe |
||
| − | |- |
||
| − | | style="text-align: center; background-color:#fe0000; color:#ffffff;" | 56 |
||
| − | | style="text-align: center; background-color:#fe0000; color:#ffffff;" | Kwuarm |
||
| − | |- |
||
| − | | style="text-align: center; background-color:#fe0000; color:#ffffff;" | 62 |
||
| − | | style="text-align: center; background-color:#fe0000; color:#ffffff;" | Snapdragon |
||
| − | |- |
||
| − | | style="text-align: center; background-color:#fe0000; color:#ffffff;" | 67 |
||
| − | | style="text-align: center; background-color:#fe0000; color:#ffffff;" | Cadantine |
||
| − | |- |
||
| − | | style="text-align: center; background-color:#fe0000; color:#ffffff;" | 73 |
||
| − | | style="text-align: center; background-color:#fe0000; color:#ffffff;" | Lantadyme |
||
| − | |- |
||
| − | | style="text-align: center; background-color:#fe0000; color:#ffffff;" | 79 |
||
| − | | style="text-align: center; background-color:#fe0000; color:#ffffff;" | Dwarf weed |
||
| − | |- |
||
| − | | style="text-align: center; background-color:#fe0000; color:#ffffff;" | 85 |
||
| − | | style="text-align: center; background-color:#fe0000; color:#ffffff;" | Torstol |
||
| − | |} |
||
| − | |||
| − | |-|Summoning={|class="wikitable sortable" |
||
| − | |||
| − | |||
| − | [[File:Skilling|thumb|right|335 px]] |
||
Latest revision as of 01:16, 29 November 2020
Skilling Guides
| Agility | Crafting | Fletching | Mining/Smithing | Summoning | Construction | Firemaking |
| Herblore/Farming | Runecrafting | Thieving | Cooking | Fishing | Hunter | Slayer |
Miscellaneous Guides
| Experience Bonus | Prestiging |
| AFK Island | Golden Equipment |
How to Start
Tools
General skilling supplies can be purchased from the skilling shop named Store Emporium. This store is located at home in the north-eastern building.